Monday, 20 August 2018

Backup and Restore Contacts on iPhone 2019


How to Backup and Restore Contacts on iPhone
Part 1: Backup and Restore Contacts on iPhone via iTunes

With the traditional way, you can backup and restore them via iTunes. iTunes will help you create a full backup for almost all your contents except the contacts.
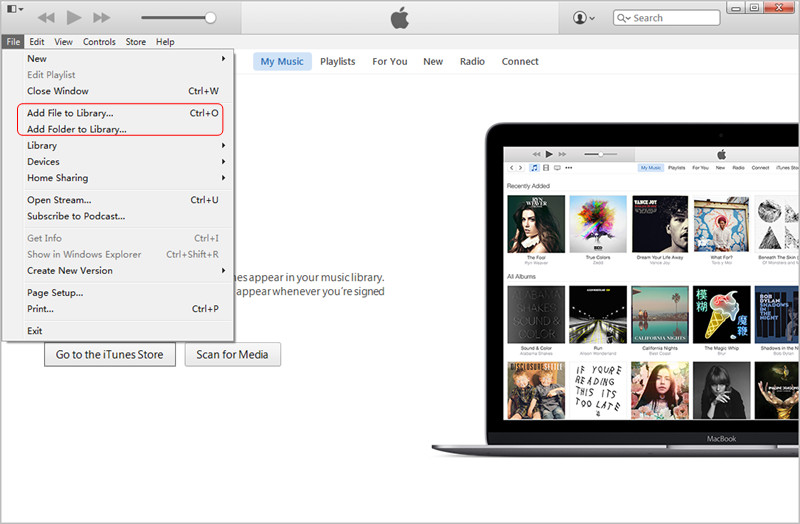
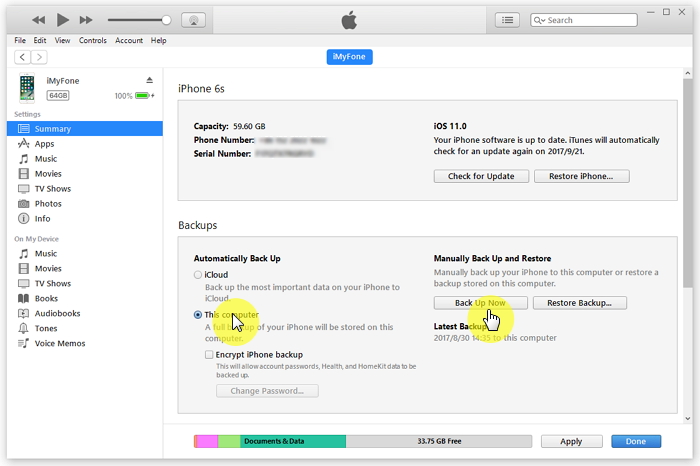
Backing up iPhone including contacts:


Connect your iPhone or other apple device to your Mac or PC.


Launch iTunes if does not open automatically.


Click on the small iPhone icon in the top left corner. Sometimes the device summary may not show on some devices.


Click ‘Back Up now’.


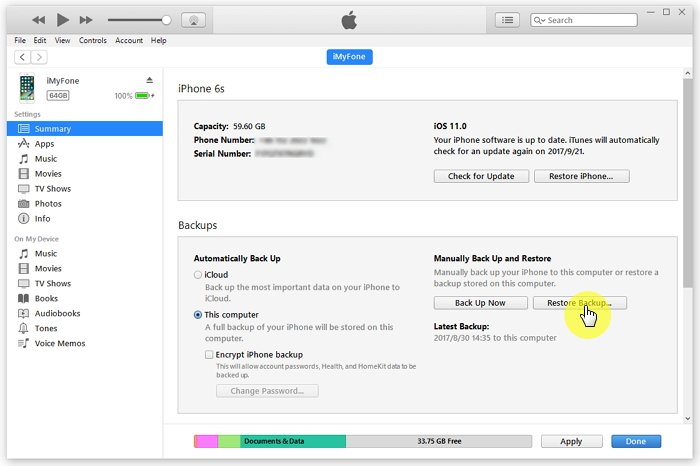
Restoring iPhone including contacts:


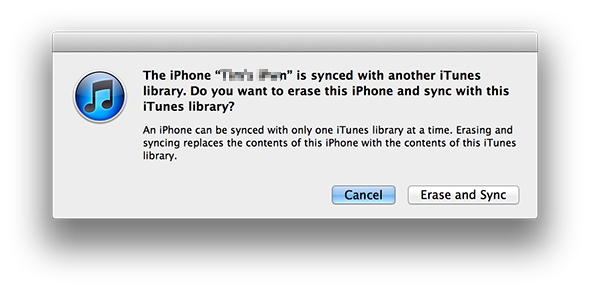
Launch iTunes and connect your iPhone/iPad/iPod touch to your PC.


Right-click your iPhone, iPad, iPod touch under the devices list and click ‘Restore Backup’.


Select the latest backup entry according to the recent dates.


Click Restore.


Note

Restoring your backup will erase all media tracks currently existing on your iPhone.
Part 2: Backup and Restore Contacts on iPhone via iCloud

Using iCloud is another trusted method of backing up and restoring your contact information. To restore the contacts, calendars and reminders, Apple owns the iCloud options for you too. You can keep your contacts safe using an Apple account.
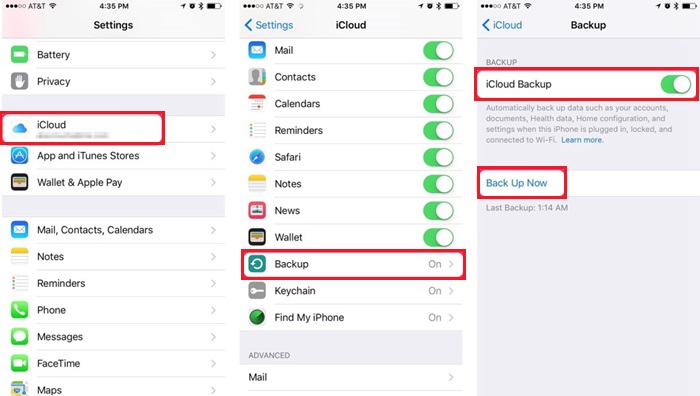
To back up iPhone including contacts:


Go to the Settings > iCloud > Backup on your iOS device.


Make sure you are on a WiFi connection and tap Back Up Now.


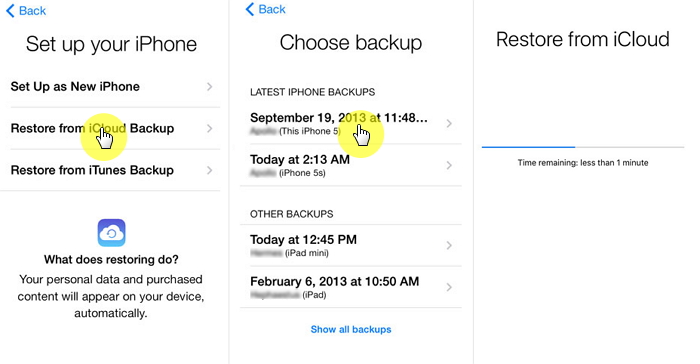
To restore iPhone including contacts:


Go to Settings -> General -> Reset, then tap “Erase all content and settings”.


On the Apps & Data screen, tap Restore from iCloud Backup, then sign in to your iCloud account.


Then select one from a list of all backups in your account. (You can go to Settings -> [your name] -> iCloud -> Storage -> Manage Storage (or Settings -> iCloud -> Storage -> Manage Storage) to see the date and size of its latest backup.)


Note
Jihosoft iTunes Backup Extractor free is a powerful tool to recover and extract important data from iPhone, iPad & iPod touch backup on Windows or Mac.
Jihosoft Android Data Recovery: the best Android Data Recovery software for Windows and Mac to recover deleted contacts, messages, photos, videos, WhatsApp and etc from Android devices.

The restoration process only restore those contacts already saved and backed up in your iPhone. The current ones will be missing with this process.


Meanwhile, the free iCloud storage is limited to 5G which means that you cannot make a complete backup if it is full.

If you can’t sync with iTunes and want to rescue data from a disable iPhone, you could try Gihosoft iPhone Data Recovery. Also feel free to ask questions on the iDevice is disabled error in the comments section below.

Thursday, 16 August 2018

How to Transfer Music from Computer to iPad without iTunes - iCloud Drive


How to Transfer Music from Computer to iPad without iTunes - iCloud Drive

Another means of transferring music from computer to your iPad without going through iTunes, is using iCloud Drive. Here’s the procedure below:
Steps to Transfer Music from Computer to iPad without iTunes

Step 1: Download iCloud onto your computer and ensure it’s also enabled on your iPad. If it isn’t already enabled, you can do this by going to Settings > iCloud>enable iCloud Drive.


Step 2: Make sure you are signed in on both your PC and iPad.

Step 3: Open iCloud on your computer, then drag and drop the media files you want to send to your iPad onto iCloud.If you can’t sync with iTunes and want to rescue data from a disable iPhone, you could try Gihosoft iPhone Data Recovery. Also feel free to ask questions on the iDevice is disabled error in the comments section below.


Step 4: Open iCloud on your iPad and the files you just transferred should appear there.

Note

The iCloud transfer method comes with its own cons.


The process is long and complicated - iCloud must be installed on your computer, and enabled on your iPad.


Your iPad and computer must be connected to the internet.


iCloud comes with a 5 GB limit, so you have to pay if you want to transfer files more than 5GB.


The speed of transferring can be slow, as it depends solely on internet connection speed.
How to Transfer Music from Computer to iPad using iTunes?

In case you would still prefer to transfer music from your PC to iPad using iTunes, then here’s a guide on how to do this:

Step 1: Connect your iPad to your PC using a USB cord.

Step 2: Open iTunes on your computer. Ensure you have the latest version of iTunes.

Step 3: Click on File > Add File/Folder to Library, then select the files you wish to add to your iTunes Library.


Step 4: Check for your device on the left sidebar, and then click on the Music tab. Then check Sync Music and select the music files to sync.


Step 5: Click Apply button to start the sync process.

Note

Using iTunes to sync music and other types of media files come with a variety of shortcomings


There’s a limit to the music formats supported by iTunes.


If you have synced your device using a different computer in the past, iTunes won’t sync without first erasing and overwriting previously saved files.


The process is time-consuming.Sponsor Ads:


Gihosoft Free iPhone Data Recovery is a professional iPhone Data Recovery software to get back all your lost text message, photo, video, call history, note, contact and more from iPhone/iPad/iPod Touch.


Sunday, 5 August 2018

How to Hack iCloud Passw0rd & Disable Apple ID

How to Hack iCloud Passw0rd & Disable Apple ID 2019


How to Hack iCloud Passw0rd & Disable Apple ID


Apple implemented several ways to prevent criminals from hacking its iCloud service. The company stopped people from guessing passwords again and again by putting an end to “brute force” attacks. Then Apple also enabled users to verify login attempts with the aspect of two-factor authentication using their smartphones. But iDict has been reported to bypass those security implementations.


If iDict does indeed work as it has been reported, there’s very little an iCloud account owner can do to protect his/her account. The tool wants users to enter the email address related to the iCloud account before anyone tries to gain access. So a way to make your iCloud account before secure is to use an email that hasn’t been shared online.


How to use the tool to hack iCloud password


The tool use a list with 500 most used passwords to hack the iCloud account.


The iDict script must be hosted on your hosting or localhost using Xampp server. You can easily download the iCloud hacking script & follow the installation guide on Github.


Moving on, there’s a buzz about why the hacking tool was released in the first place. When researchers uncover an exploit in a software, they usually report privately to the vulnerable company to prevent widespread use by hackers.


This is the same service that hackers exploited last year to leak naked images of hundreds of online celebrities. Stars like Kate Upton and Jennifer Lawrence had their iCloud accounts compromised when hackers bypassed Apple’s security questions. The company later bumped security to prevent access to accounts.


Let’s see what Apple does in this case.


Important Update: This no longer works. So we recommend you to avoid this tool because your Apple ID can be disabled. Meanwhile, you can read our guide on how to find iCloud email and password from an older backup.


iPhone backup extractor :The best iPhone Backup Extractor software to extract photos, text messages, contacts, voice memos, note, WhatsApp, Viber and etc from iPhone/iPad backup

Gihosoft Free iPhone Data Recovery is a professional iPhone Data Recovery software to get back all your lost text message, photo, video, call history, note, contact and more from iPhone/iPad/iPod Touch. It offers a full solution to recover your lost data in different tough situations. Besides recovering data directly from iPhone, iPad and iPod touch, it also allows you to recover data from iCloud and iTunes backup files.

Friday, 3 August 2018

Top 5 Spy Apps for iPhone to Use in 2018-2019


Top 5 Spy Apps for iPhone to Use in 2018-2019
The Top 5 Best Spy Apps for iPhone Reviewed

Check out our list and choose the best Spy app for iPhone. Keep in mind that a targeted iPhone might need to go through the jailbreak process before many of these apps can be installed.Free iTunes/iPhone Backup Extractor for iPhone, iPad


1. mSpy – The Best Spy App for iOS and Other Devices

This software will allow you to track any smartphone or tablet. After the app is functional, it will begin recording all activities on the target device and it even uploads the collected data into your online account for monitoring and controlling purposes. For the iPhones (or any other iOS devices), it comes with an additional feature at no extra cost – which means it will be possible to use the app without the device being jailbroken. However, this would be in the case that you have a valid AppleID and while this is good news it also means the features are limited to tracking call logs, SMS, contacts, browser history, Notes and Events.


Price: $39.99 for one month

Pros: It can be used on non-jailbroken iPhone, and is extremely reliable with great features and an interactive interface.

Cons: It is expensive and only has limited features on a non-jailbroken iPhone.

Download MSpy
2. FoneMonitor – iPhone Monitoring App

This is a web based iPhone and Android phone spy tool which allows parents to watch over their kids and business owners to monitor their employees during worktime. Once it is used to spy on an iPhone or iPad it doesn’t necessary for the target device to be jailbroken or to install any app. After creating a FoneMonitor account just verify the Apple ID connected to the target phone which will allow you to track call logs, SMS and iMessages, locations, bookmarks, browser history, WhatsApp messages, contacts, photos and videos, apps, reminders, voice memos and calendar activities.


Price: $29.99 per month

Pros: It can be used on non-jailbroken iPhones or iPads and the app doesn’t need to be installed on the target. It can be used to track a lot of data, even on WhatsApp

Cons: Cannot be used to monitor Facebook messenger.

Try FoneMonitor
3. FlexiSPY – One Of the Best Spying App for iPhone

In case you want an app that will allow you to record videos without anyone noticing then this is the app for you. Launching this will allow you to record a video up to an hour long while you pretend to use your phone for other purposes.


Price: $1.99

Pros: No jailbreaking required and has great low light recording and super stealth.

Cons: Cannot save videos in the gallery.

Get FlexiSPY
4. Spymaster Pro – Invisible iPhone Tracking App

The Spymaster Pro is a renowned monitoring software on the market which helps the user to safeguard children, loved ones and business partners in a secure manner. It is quite easy to use and only requires that you register the account, install the software and then enjoy it. It is possible to track phones, GPS, SMS, book addresses, web history, WhatsApp, contacts, multimedia and much more!


Price: $49.99 every 3 months.

Pros: It can track a variety of content.

Cons: None.

Get Spymaster Pro

See Also: Best Keyloggers for iPhone
5. HighsterMobile – Best iPhone Spy App

This is one of the most highly recommended iPhone tracking apps since it has all the necessary spy features, such as allowing you to view messages, call logs and emails and even track where they are and also have remote access to their camera. The best part, however, is the ability to uninstall the app remotely when required.


Price: $69.99

Pros: One time purchase (no monthly fees) and can be uninstalled remotely.

Cons: Requires jailbreak.

Get HighsterMobile

Gihosoft iPhone Data Recovery is a completely free yet powerful data recovery software to retrieve deleted or lost data from iPhone, iPad and iPod touch.

How to Set Screen Time for Parental Control 2019

How to Set Screen Time for Parental Control 2019

Set Screen Time for Parental Control

How to Set Screen Time for Parental Control

Parents can use this app to put screen time parental control on their children’s iPhone or iPad to help in managing their phone usage.
1. Enable Screen Time from Settings

To be able to use all the Screen Time features on your iPhone or iPad, you need to first enable Screen Time on your phone. You will then need to set up the different sub-features individually according to your requirements. Most of the time you will find Screen Time enabled as a default in iOS 12, but if it is not follow these steps to enable it:

Step 1: On your iPhone go to Settings and click on the Screen Time feature.

Step 2: Click on the Turn on Screen Time feature.

Step 3: Two options will be displayed that you need to choose from. Choose the feature as a parent or a normal user.

Step 4: Then click on Continue.


You need to set a Screen Time passcode if you do not want other people using your Screen Time and making changes to your Screen Time settings. This is how you set a Screen Time passcode.

Step 1: Click on Screen Time passcode.

Step 2: Then enter a new passcode and click Confirm. You have now set up your Screen Time.
2. Set App Limits

Screen Time allows you to set screen time parental control on particular apps that you use every day to prevent you from overusing them. If you feel you need to set limits on a particular category of apps, you can use App limits to do it. These are the steps you need to follow to set this up:

Step 1: On your iPhone open Screen Time, click on App limits, and enter your passcode.

Step 2: Click on the Add limit tab.

Step 3: Choose the app categories that you want to set limits on like entertainment, social networking, games etc. then click Add.

Step 4: Set the time limit for the app categories you selected. Note that you will get a ‘Time limit reached’ alert notice every day at midnight notifying you of the App limits reset. You can ignore it by clicking Ignore limit tab.


3. Downtime

Downtime is a scheduling app that helps you to choose only the apps you require and phone calls that you can use on your device at a particular time. This is how you set it up:

Step 1: On your iPhone Settings go to Screen Time.

Step 2: Scroll down to Downtime and enter your Screen Time passcode and Turn on downtime switch.

Step 3: Click Start to set the time then click End to set the time limit.

Step 4: Your Home screen will then get dimmer and only the approved apps will appear when downtime is working. A ‘Time limit reached’ alert message will appear if you try to open any other app apart from the approved ones.

Step 5: To ignore it click on ‘Ignore limit’ then enter your Screen Time passcode. Click on the Green plus button to add allowed apps and the Red button to delete apps then select Always and enter your passcode.

Step 6: Your Home screen will brighten as normal meaning you have finished setting up your downtime.


4. Monitoring App Usage

You will receive a detailed weekly report of how you have used your iPhone or iPad in the last seven days. A popup summary will show you how you have used your device on a daily basis comparing it to the previous week if it has gone up or down. You also receive the average number of daily notifications you received. Screen Time uses bar chart color-coded to show you your daily app usage on the most used apps and an Insight section on useful observations.

From the summary report you get to see the length of your longest session, the daily usage graph, after bed device usage time which can be a problem. You also get information on the apps that are sending the most notifications and causing the most pickups.

With this information you are in a better position of knowing how you are using every app on your device and if it is necessary to put screen time parental control in iOS 12 on specific apps.


5. Setup Content & Privacy Restriction

Screen Time is a great app that you can use to customize and block unwanted content from your device. To set these restrictions you need to follow these steps:

Step 1: On your iPhone go to Settings and open Screen Time.

Step 2: Select the Content & privacy restrictions tab and enter your Screen Time passcode.

Step 3: Turn on the Content & privacy switch.

Step 4: Once you are done you can now put screen time parental control iOS 12 on almost everything like on iTunes purchases, app purchases, apps volume limit, apps explicit language, do not disturb etc.


Smartphones are becoming too addictive to the point of concerned parents wanting to monitor and put screen time parental control on their children’s devices. With the different features available, you can now effectively put screen time parental control iOS 12 to manage your iPhone or iPad usage in a healthier way.

Jihosoft Giveaway Alert:
Comment and win free lifetime registration code of Jihosoft iPhone Backup Extractor - Extract Data from iPhone Backup https://www.jihosoft.com/itunes/itunes-backup-extractor-free.html
The best iPhone Backup Extractor software to extract photos, text messages, contacts, voice memos, note, WhatsApp, Viber and etc from iPhone/iPad backup.


4 Tools to Manage iPhone Music without iTunes 2019

2 CopyTrans Manager This is a free way to manage iPhone music without iTunes. It enables you to easily drag and drop audios and videos direc...